※取り付け時はホース側を軽く引っ張ってきちんとはまっていることを確認してください。(画像6及び画像7)
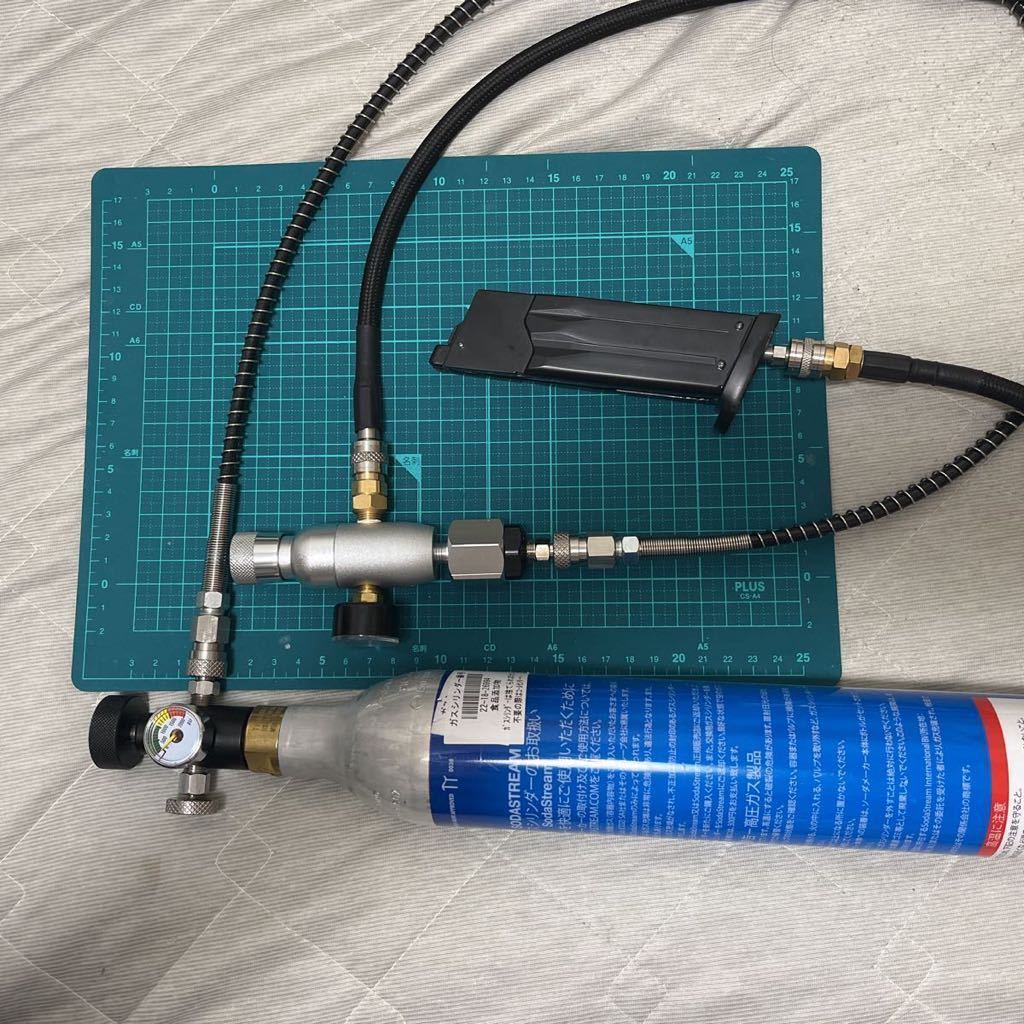
画像1:連射用レギュレーター(銀色)の場合
※繊維コーティングの耐圧ホースは安全のため必ず200psi(約13.6気圧)以下の運用をお願いします。
※繊維コーティングの耐圧ホースの替わりにその他(コイルホース等)耐圧ホースは使っても耐圧上問題ありません。
画像2:ガスブロ・固定ガスガン用レギュレーター(黒色)の場合
※繊維コーティングの耐圧ホースでは設定圧力により破断の可能性があるため使用しないでください。必ずその他(コイルホース等)耐圧ホースを使用ください。
次に、S型ボンベ(ソーダストリームボンベ等)にON-OFFスイッチ付きアダプターを取り付ける前に必ず以下の手順を踏んでください。
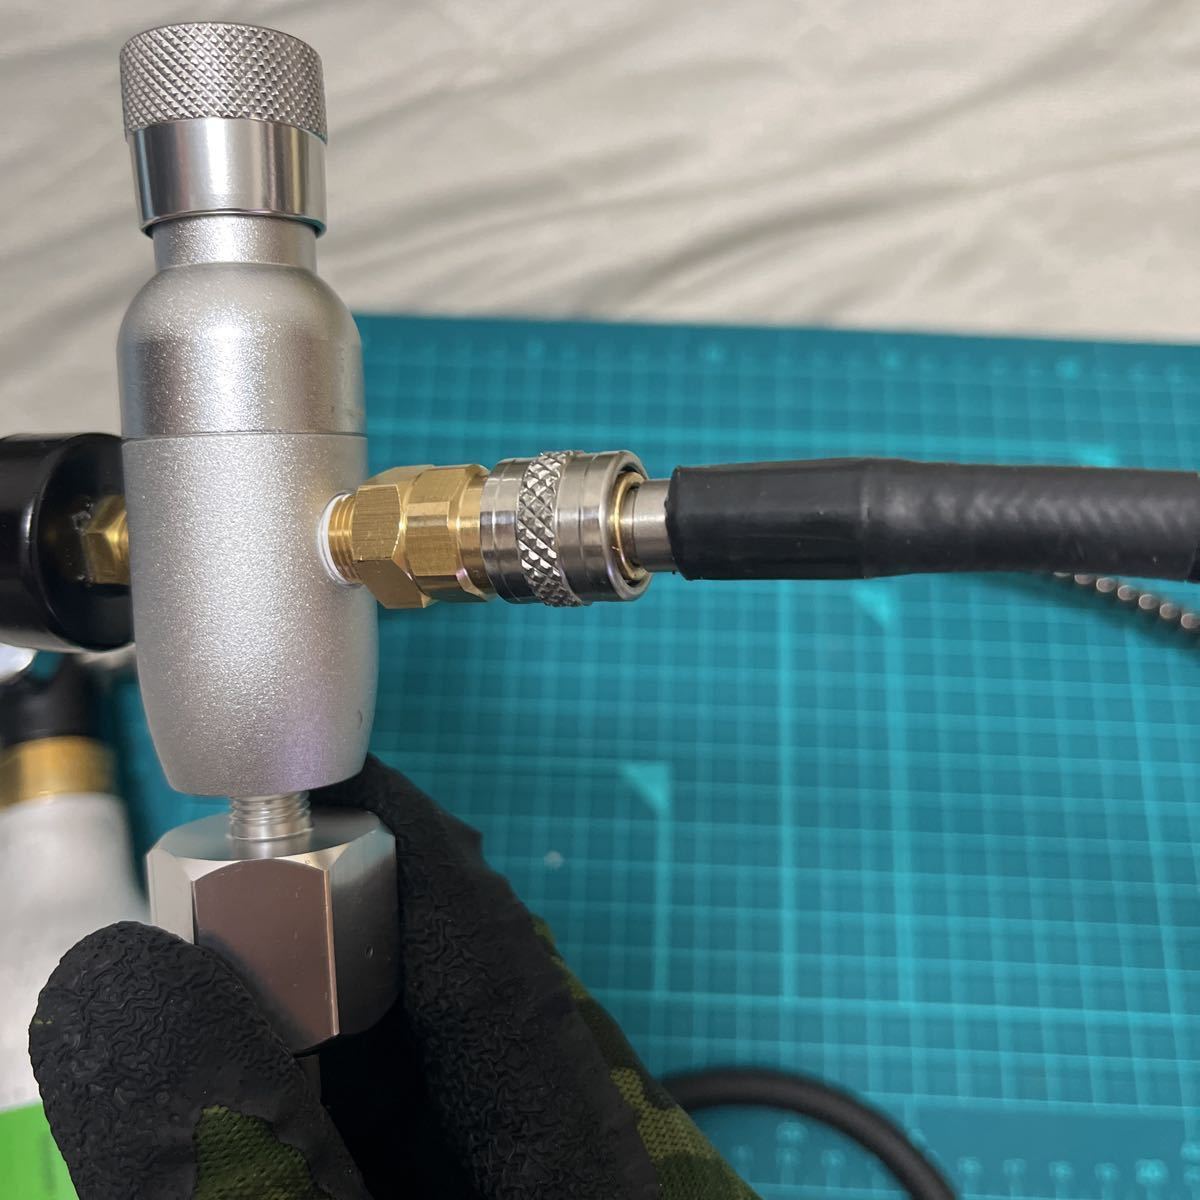
・ON-OFFスイッチ付きアダプター上部の黒いハンドル We cannot assist in shipping and purchasing steering wheels that contain airbags. If they do not contain airbags, press Confirm to place a bid. (画像5)を反時計回りに止まるまで回してアダプター内側の開封ピンを上に引き上げます。
※回す場合は軽い力で止まるまででいいです。力を入れすぎるとハンドル We cannot assist in shipping and purchasing steering wheels that contain airbags. If they do not contain airbags, press Confirm to place a bid. が壊れるので注意してください。
※開封ピンを下げたままの状態でアダプターを取り付けるとCO2が吹き出ますので必ず引き上げてから取り付けてください。
※全てのハンドル We cannot assist in shipping and purchasing steering wheels that contain airbags. If they do not contain airbags, press Confirm to place a bid. ・ネジ・カプラー等のパーツは正面から見て「時計回りで締め込み」「反時計回りで緩め」になります。(重要)
・次にON-OFFスイッチ付きアダプター内側にシリコンパッキン(白色)を付けた状態でS型ボンベに手でゆっくりねじ込みます。
※アダプターが手で回らなくなったらそこで止めます。(手締めでOK。スパナ等を使うとアダプターが破損する場合があります。)
これで準備が完了です。
ここからいよいよCO2充填手順になります。
・ON-OFFスイッチ付きアダプター上部の黒いハンドル We cannot assist in shipping and purchasing steering wheels that contain airbags. If they do not contain airbags, press Confirm to place a bid. (画像5)を「時計回り」にゆっくりmm単位で回していきます。
・一定の位置まで黒いハンドル We cannot assist in shipping and purchasing steering wheels that contain airbags. If they do not contain airbags, press Confirm to place a bid. を回すとアダプター内側の開封ピンがS型ボンベの閉止弁を押し下げてCO2が耐圧ホースに流れます。
※ある位置を過ぎるとCO2が流れプシュと音がして耐圧ホースが揺れますので、その位置で黒いハンドル We cannot assist in shipping and purchasing steering wheels that contain airbags. If they do not contain airbags, press Confirm to place a bid. (画像5)を回すのを止めます。(超重要)
※画像4にCO2充填状態時の圧力計の画像を載せています。アダプター側の圧力計は、S型ボンベが満タン状態で800psi付近、空に近くなってくると500psiを切るあたりまで下がります。
これでレギュレーター手前までCO2が充填されました。
次にレギュレーターの調整手順に移ります。
・レギュレーター手前まで圧力をかけた状態で圧力調整ハンドル We cannot assist in shipping and purchasing steering wheels that contain airbags. If they do not contain airbags, press Confirm to place a bid. (連射用レギュレーター:上部(画像7)、ガスブロ・固定ガスガン用:側部(画像9))のハンドル We cannot assist in shipping and purchasing steering wheels that contain airbags. If they do not contain airbags, press Confirm to place a bid. をレギュレーターの圧力計を見ながら「時計回り」にゆっくりmm単位で回していきます。
※慣れるまでは必ず、最初に圧力調整ハンドル We cannot assist in shipping and purchasing steering wheels that contain airbags. If they do not contain airbags, press Confirm to place a bid. を「反時計回り」に目いっぱい回した状態(レギュレーター内部弁を完全に閉止した状態)から始めるようにしてください。
※レギュレーターからマガジンまでの気密が完璧な場合、圧力調整ハンドル We cannot assist in shipping and purchasing steering wheels that contain airbags. If they do not contain airbags, press Confirm to place a bid. をある位置まで回すと突然圧力が上がりますので必ずmm単位で回してください。
※レギュレーターは圧力を上げすぎて一度でも圧力計の針が振り切れたら、正しい圧力の表示ができなくなります(圧力計が壊れます)ので圧力計上限近くでの運用は避けてください。
・目標の圧力までレギュレーターの圧力計が上がったらそこで圧力調整ハンドル We cannot assist in shipping and purchasing steering wheels that contain airbags. If they do not contain airbags, press Confirm to place a bid. を回すのを止めます。
ここでマガジンまでのガスの充填が完了です。あとはフロンガス使用時と同様に操作して遊び(撃ち)ましょう。
・なお、圧力が高すぎるとエアガンのハンマーがバルブを叩ききれなくなるので、途中途中で初速を測りながら調整してください。(法律は必ず順守してください)
※レギュレーターを通過したガスは圧力を上げすぎたと思って慌てて圧力調整ハンドル We cannot assist in shipping and purchasing steering wheels that contain airbags. If they do not contain airbags, press Confirm to place a bid. を元に戻しても下がりません。
その場合、エアガン側で空撃ちできる場合は空撃ちしてマガジン側からガス抜きを行うことになりますが、バルブを叩ききれない状態まで上げてしまうとマガジンの放出バルブをトンカチ等で叩いて強制排気することになります。
※圧力がかかった状態でマガジンやレギュレーターのカプラーを外すとCO2が噴出したり、外れた耐圧ホースが跳ねて大変危険ですので絶対行わないでください。
外部ソースを堪能したら、次は手じまいの手順です。
・ON-OFFスイッチ付きアダプター上部の黒いハンドル We cannot assist in shipping and purchasing steering wheels that contain airbags. If they do not contain airbags, press Confirm to place a bid. (画像5)を「反時計回り」に回して開封ピンを上に引き上げ、S型ボンベからのCO2放出を止めます。
CO2充填手順でプシュとなった瞬間にちゃんとハンドル We cannot assist in shipping and purchasing steering wheels that contain airbags. If they do not contain airbags, press Confirm to place a bid. を止めていれば、ハンドル We cannot assist in shipping and purchasing steering wheels that contain airbags. If they do not contain airbags, press Confirm to place a bid. は半周位回せばいいです。
※ON-OFFスイッチ付きアダプター内部の圧力が高いため、手じまい時のハンドル We cannot assist in shipping and purchasing steering wheels that contain airbags. If they do not contain airbags, press Confirm to place a bid. は最初の時よりも重いです。
・次にON-OFFスイッチ付きアダプター側部のベント弁(画像5。銀色)を一気に解放して耐圧ホース内のCO2を抜きます。
※耐圧ホースの長さにもよりますが、およそ1~2秒でCO2の噴出は止まります。
※ベント弁の解放が不十分な場合、アダプター内部の圧力が下がらずCO2の噴出が止まらなかったり、気化熱でアダプターのパッキンやベント弁のOリングが凍結しダメになる場合がありますので、必ず一気に解放してください。
・連射用レギュレーター(銀色)はベント弁をしばらく(5秒位)解放しておくとマガジンに溜まった高圧ガスが抜けますが、ガスブロ・固定ガスガン用レギュレーター(黒色)はレギュレーターを通過したガスが抜けきれないので、エアガン側で空撃ちしてマガジン内のガス抜きを行ってください。
・ガス抜きが完了したら、パーツやカプラーを外しても問題ありません。
※私の場合は、S型ボンベにアダプターと耐圧ホースを取り付けたままの状態(レギュレーターから先は外します)で部屋に転がしています。(笑)
よくある質問)
Q)S型ボンベかコイルホースセットでガスブロ・固定ガスガン用レギュレーターに接続しているがレギュレーターの圧力計が動かない。
A)コイルホースセットのレギュレーター側接続部の黒いパーツ(ペイントボール規格変換アダプター)を一度確認ください。
ペイントボール規格変換アダプターの穴が小さいタイプの場合、レギュレーター側の突起がぴったりアダプターの穴にはまるためCO2がレギュレーター側に流れていないのが原因です。アダプター側の穴を広げてガスが流れるようにすれば解消します。
※最新のロットはアダプター側の穴が大きいタイプを使用していますので、この不具合は発生しません。
Q)誤ってレギュレーターの圧力計を振り切ってしまい圧力計が壊れた。修理部品が欲しい。
A)圧力計の在庫ですが、ガスブロ・固定ガスガン用レギュレーターは少量あります。連射用は原則ございません。(どうしても必要という方は在庫がある場合もありますので、一度お尋ねください。)
Q)ガスが漏れている音がしてレギュレーターの圧力があがらない。
A)きちんと接続できている場合のガス漏洩個所はほとんどのケースが以下の場所です。
ユニバーサルコネクター接続部からの漏洩の場合は、ユニバーサルカプラーとコネクターの接続部の密着が不完全なことが原因の場合が多いです。圧力をかけた状態でホース側を軽く振ってください。何度か試して解消しない場合はパッキンを交換してください。
一番多いのがマガジンの注入バルブ穴とユニバーサルコネクターのネジ山が密着していないケースです。強く回しすぎるとマガジン注入バルブのネジ山がバカになってしまうことがありますので漏れない程度(手で回して回らなくなったらスパナ等で追加3周程度)で締めてください。シールテープを3周程度巻いて改善しない場合は、私はマガジン外側から樹脂で固めています。(画像8)
Q)ユニバーサルカプラーにコネクターがはまらない。
A)一応出荷時に全数確認していますが、長い期間放置するとカプラー内のゴムパッキンが本体に固着している場合があります。シリコンオイルを吹き付けてマイナスドライバー等でカプラー奥のゴムパッキンのところにある金属パーツ部分を数回押してください。(パッキンや金属パーツは補修用を出品しています。)
追記)黒色の耐圧ホースやHPAカプラーはスパナで回すところが六角形になっているHPAコネクターにしか原則対応していません。(六角形のHPAコネクターはどのタイプにも基本はまります。六角形のHPAコネクターは単品では出品していませんので、必要な方はお尋ねください。価格は1個or2個セットの出品物と同じです。)


 JAPAN POST)
 Malaysia